

Introduction
Apache Spark, a framework for parallel distributed data processing, has risen in popularity as a prime option for developing streaming applications, data lake houses, and big data ETL (extract-transform-load) processing. It boasts horizontal scalability, fault tolerance, and robust performance at high scale. Traditionally, managing and scaling Spark jobs on Apache Hadoop clusters posed challenges, partly due to the constraints of physical systems and configuring the Kerberos security protocol used by Hadoop. Enter Kubernetes – an emerging alternative to Apache Hadoop.
Kubernetes serves as an open-source platform for deploying and managing a wide array of containerized applications. This article delves into the process of deploying Apache Spark on Amazon EKS utilizing Canonical’s Charmed Spark solution.
Kubernetes lays a robust foundation for Spark-based data processing jobs and applications. Contrasted with Hadoop, it provides more adaptable security and networking models, a versatile platform capable of accommodating auxiliary applications like Apache Kafka or MongoDB that supplement Spark workloads. Moreover, most key features of Hadoop YARN are accessible in Kubernetes through extensions like Volcano.
You can initiate Spark jobs on a Kubernetes cluster directly from the Spark command line tool sans any additional requirements. However, there are advantageous supplemental components deployable to Kubernetes via an operator. An operator functions as software that oversees the component, handling deployment, configuration, and other duties tied to the component’s lifecycle.
Solution overview
The visual below illustrates the solution detailed in this post.
This post guides you in setting up the resources featured in the diagram from your Ubuntu workstation, including:
- Virtual Private Cloud (VPC)
- Amazon Elastic Kubernetes Service (Amazon EKS) Cluster with a single node group utilizing two spot instance pools
- Amazon EKS Add-ons: CoreDNS, Kube_Proxy, EBS_CSI_Driver
- Cluster Autoscaler
- Canonical Observability Stack deployed to the EKS cluster
- Prometheus Push Gateway deployed to the EKS cluster
- Spark History Server deployed to the EKS cluster
- Traefik deployed to the EKS cluster
- Amazon EC2 edge node with the spark-client and juju snaps installed
- S3 bucket for data storage
- S3 bucket for job log storage
Walkthrough
Prerequisites
Before proceeding, confirm that you operate an Ubuntu workstation, possess an AWS account, have a profile with administrator privileges configured, and have the necessary tools installed locally:
- Ubuntu 22.04 LTS
- AWS Command Line Interface (AWS CLI)
- kubectl snap
- eksctl
- spark-client snap
- juju snap
Deploy infrastructure
Prior to executing AWS CLI commands, establish your AWS credentials profile locally. Follow the subsequent directives to deploy the environment and EKS cluster. Deployment is estimated to require roughly 20 minutes.
snap install aws-cli --classic
snap install juju
snap install kubectl

aws configure
# input required details when prompted

wget https://github.com/eksctl-io/eksctl/releases/download/v0.173.0/eksctl_Linux_amd64.tar.gz
tar xzf eksctl_Linux_amd64.tar.gz
cp eksctl $HOME/.local/bin

cat > cluster.yaml <<EOF
apiVersion: eksctl.io/v1alpha5
kind: ClusterConfig

metadata:
    name: spark-cluster
    region: us-east-1
    version: "1.29"
iam:
  withOIDC: true

addons:
- name: aws-ebs-csi-driver
  wellKnownPolicies:
    ebsCSIController: true

nodeGroups:
    - name: ng-1
      minSize: 2
      maxSize: 5
      iam:
        withAddonPolicies:
          autoScaler: true
        attachPolicyARNs:
        - arn:aws:iam::aws:policy/AmazonEKSWorkerNodePolicy
        - arn:aws:iam::aws:policy/AmazonEKS_CNI_Policy
        - arn:aws:iam::aws:policy/AmazonEC2ContainerRegistryReadOnly
        - arn:aws:iam::aws:policy/AmazonSSMManagedInstanceCore
        - arn:aws:iam::aws:policy/AmazonS3FullAccess
      instancesDistribution:
        maxPrice: 0.15
        instanceTypes: ["m5.xlarge", "m5.large"]
        onDemandBaseCapacity: 0
        onDemandPercentageAboveBaseCapacity: 50
        spotInstancePools: 2
EOF

eksctl create cluster --ssh-access -f cluster.yaml
Verify the deployment
List Amazon EKS nodes
Use the subsequent command to update the kubeconfig on your local machine, enabling interaction with the Amazon EKS Cluster via kubectl to affirm the deployment.
aws eks --region $AWS_REGION update-kubeconfig --name spark-on-eksCheck if two nodes have been created through the deployment.
kubectl get nodes -l 'NodeGroupType=ng01'

# Output should resemble the following
NAME  STATUS  ROLES AGE  VERSION
ip-10-1-0-100.us-west-2.compute.internal   Ready    <none>   62m   v1.27.7-eks-e71965b
ip-10-1-1-101.us-west-2.compute.internal   Ready    <none>   27m   v1.27.7-eks-e71965b
Configure Spark History Server
After creating the cluster, modify the kubeconfig configuration file so that the spark-client tooling can leverage it.
TOKEN=$(aws eks get-token --region us-east-1 --cluster-name spark-cluster --output json)

sed -i "s/^    token: .*$/^    token: $TOKEN/g" $HOME/.kube/config
Use the ensuing commands to establish S3 buckets for spark’s data and logs.
aws s3api create-bucket --bucket spark-on-eks-data --region us-east-1
aws s3api create-bucket --bucket spark-on-eks-logs --region us-east-1
Subsequently, configure Juju for deploying the Spark History Server. Execute the following directives:
cat $HOME/.kube/config | juju add-k8s eks-cloud

juju add-model spark eks-cloud
juju deploy spark-history-server-k8s --channel=3.4/stable
juju deploy s3-integrator
juju deploy traefik-k8s --trust
juju deploy prometheus-pushgateway-k8s --channel=edge

juju config s3-integrator bucket="spark-on-eks-logs" path="spark-events"
juju run s3-integrator/leader sync-s3-credentials access-key=${AWS_ACCESS_KEY_ID} secret-key=${AWS_SECRET_ACCESS_KEY}
juju integrate s3-integrator spark-history-server-k8s
juju integrate traefik-k8s spark-history-server-k8s
Configure monitoring
Integrate your Spark jobs with the monitoring stack by running the commands below to deploy the monitoring stack and integrate the Prometheus Pushgateway.
juju add-model observability eks-cloud

curl -L https://raw.githubusercontent.com/canonical/cos-lite-bundle/main/overlays/storage-small-overlay.yaml -O

juju deploy cos-lite
  --trust
  --overlay ./storage-small-overlay.yaml

juju deploy cos-configuration-k8s --config git_repo=https://github.com/canonical/charmed-spark-rock --config git_branch=dashboard
  --config git_depth=1 --config grafana_dashboards_path=dashboards/prod/grafana/
juju-wait

juju integrate cos-configuration-k8s grafana

juju switch spark
juju consume admin/observability.prometheus prometheus-metrics
juju integrate prometheus-pushgateway-k8s prometheus-metrics
juju integrate scrape-interval-config prometheus-pushgateway-k8s
juju integrate scrape-interval-config:metrics-endpoint prometheus-metrics

PROMETHEUS_GATEWAY_IP=$(juju status --format=yaml | yq ".applications.prometheus-pushgateway-k8s.address")
Create and execute a sample Spark job
We’ll delve into creating and running a sample Spark job. Spark jobs represent data processing applications crafted using Python or Scala, distributing data processing across numerous Spark executors, facilitating parallel, distributed processing for expedited job completion.
Commence an interactive session enabling you to launch Spark on the cluster and formulate a processing job in real-time. Kick off by setting configurations for your spark jobs.
cat > spark.conf <<EOF
spark.eventLog.enabled=true
spark.hadoop.fs.s3a.aws.credentials.provider=org.apache.hadoop.fs.s3a.SimpleAWSCredentialsProvider
spark.hadoop.fs.s3a.connection.ssl.enabled=true
spark.hadoop.fs.s3a.path.style.access=true
spark.hadoop.fs.s3a.access.key=${AWS_ACCESS_KEY_ID}
spark.hadoop.fs.s3a.secret.key=${AWS_SECRET_ACCESS_KEY}
spark.eventLog.dir=s3a://spark-on-eks-logs/spark-events/
spark.history.fs.logDirectory=s3a://spark-on-eks-logs/spark-events/
spark.driver.log.persistToDfs.enabled=true
spark.driver.log.dfsDir=s3a://spark-on-eks-logs/spark-events/
spark.metrics.conf.driver.sink.prometheus.pushgateway-address=${PROMETHEUS_GATEWAY_IP}:9091
spark.metrics.conf.driver.sink.prometheus.class=org.apache.spark.banzaicloud.metrics.sink.PrometheusSink
spark.metrics.conf.driver.sink.prometheus.enable-dropwizard-collector=true
spark.metrics.conf.driver.sink.prometheus.period=1
spark.metrics.conf.driver.sink.prometheus.metrics-name-capture-regex=([a-zA-Z0-9]*_[a-zA-Z0-9]*_[a-zA-Z0-9]*_)(.+)
spark.metrics.conf.driver.sink.prometheus.metrics-name-replacement=$2
spark.metrics.conf.executor.sink.prometheus.pushgateway-address=${PROMETHEUS_GATEWAY_IP}:9091
spark.metrics.conf.executor.sink.prometheus.class=org.apache.spark.banzaicloud.metrics.sink.PrometheusSink
spark.metrics.conf.executor.sink.prometheus.enable-dropwizard-collector=true
spark.metrics.conf.executor.sink.prometheus.period=1
spark.metrics.conf.executor.sink.prometheus.metrics-name-capture-regex=([a-zA-Z0-9]*_[a-zA-Z0-9]*_[a-zA-Z0-9]*_)(.+)
spark.metrics.conf.executor.sink.prometheus.metrics-name-replacement=$2
EOF

spark-client.service-account-registry create --username spark --namespace spark --primary --properties-file spark.conf --kubeconfig $HOME/.kube/config
Initiate a Spark shell
To commence an interactive pyspark shell, utilize the ensuing command. This enables you to interactively execute commands from your Ubuntu workstation, which will be processed in a spark session running on the EKS cluster. For this to function, EKS worker nodes must route IP traffic to the Spark “driver” running on your workstation. To enable routing between your EKS worker nodes and your Ubuntu workstation, we will employ sshuttle.
sudo apt install sshuttle
eks_node=$(kubectl get nodes -l 'NodeGroupType=ng01' -o wide | tail -n 1 | awk '{print $7}')
sshuttle --dns -NHr ec2-user@${eks_node} 0.0.0.0/0
eks-node
Launch a pyspark shell by opening another terminal:
spark-client.pyspark --username spark --namespace sparkYou should encounter an output akin to the following:
Welcome to
      ____              __
     / __/__  ___ _____/ /__
    _ / _ / _ `/ __/  '_/
   /__ / .__/_,_/_/ /_/_   version 3.4.2
      /_/

Using Python version 3.10.12 (main, Nov 20 2023 15:14:05)
Spark context Web UI available at http://10.1.0.1:4040
Spark context available as 'sc' (master = k8s://https://10.1.0.15:16443, app id = spark-83a5f8365dda47d29a60cac2d4fa5a09).
SparkSession available as 'spark'.
>>>
Write a Spark job
Using the interactive pyspark shell, construct a simple illustrative job processed in a parallel, distributed manner on the EKS cluster. Execute the subsequent commands:
lines = """Canonical's Charmed Data Platform solution for Apache Spark runs Spark jobs on your Kubernetes cluster.
You can get started right away with MicroK8s - the mightiest tiny Kubernetes distro around!
The spark-client snap simplifies the setup process to get you running Spark jobs against your Kubernetes cluster.
Spark on Kubernetes is a complex environment with many moving parts.
Sometimes, small mistakes can take a lot of time to debug and figure out.
"""

def count_vowels(text: str) -> int:
  count = 0
  for char in text:
    if char.lower() in "aeiou":
      count += 1
  return count

from operator import add
spark.sparkContext.parallelize(lines.splitlines(), 2).map(count_vowels).reduce(add)
To exit the pyspark shell, input quit().
Access Spark History Server
To connect to the Spark History Server, utilize a Juju command to fetch the service’s URL, which you can paste into your browser:
juju run traefik-k8s/leader -m spark show-proxied-endpoints

# You should view output similar to:
Running operation 53 with 1 task
  - task 54 on unit-traefik-k8s-0

Waiting for task 54...
proxied-endpoints: '{"spark-history-server-k8s": {"url": "https://10.1.0.186/spark-model-spark-history-server-k8s"}}'
You should receive a URL in the response enabling connection to the Spark History Server.
Scaling your Spark cluster
Scaling a Spark cluster proves advantageous as enlarging the cluster’s capacity by adding more nodes permits running additional Spark executors in parallel. This results in faster execution of extensive jobs and concurrent execution of multiple jobs.
Spark is architected for scalability. When necessity arises for increased capacity at particular times, scaling out by adding nodes to the underlying Kubernetes cluster or scaling in by removing nodes is feasible. As data is stored externally to the Spark cluster in S3, there is minimal risk of data loss. This adaptability enables seamless adjustment of your system to meet evolving demands, ensuring optimal performance and cost efficiency.
To execute a Spark job with dynamic resource scaling, apply the supplementary configuration parameters showcased below.
spark-client.spark-submit
…
--conf spark.dynamicAllocation.enabled=true
--conf spark.dynamicAllocation.shuffleTracking.enabled=true
--conf spark.dynamicAllocation.shuffleTracking.timeout=120
--conf spark.dynamicAllocation.minExecutors=10
--conf spark.dynamicAllocation.maxExecutors=40
--conf spark.kubernetes.allocation.batch.size=10
--conf spark.dynamicAllocation.executorAllocationRatio=1
--conf spark.dynamicAllocation.schedulerBacklogTimeout=1
…
The EKS cluster is already primed for auto-scaling of the node group, actively bringing additional EKS worker nodes online as the desire for resources from Spark jobs escalates.
View Spark job statistics in Grafana
The deployment incorporates the Canonical Observability Stack (COS) inclusive of Prometheus and Grafana, equipped with ready-to-use Grafana dashboards. Attain the login secret alongside the Grafana Dashboard URL by running the following command:
juju switch observability
juju run grafana/leader get-admin-password
Input admin as username and the password derived from the preceding command.
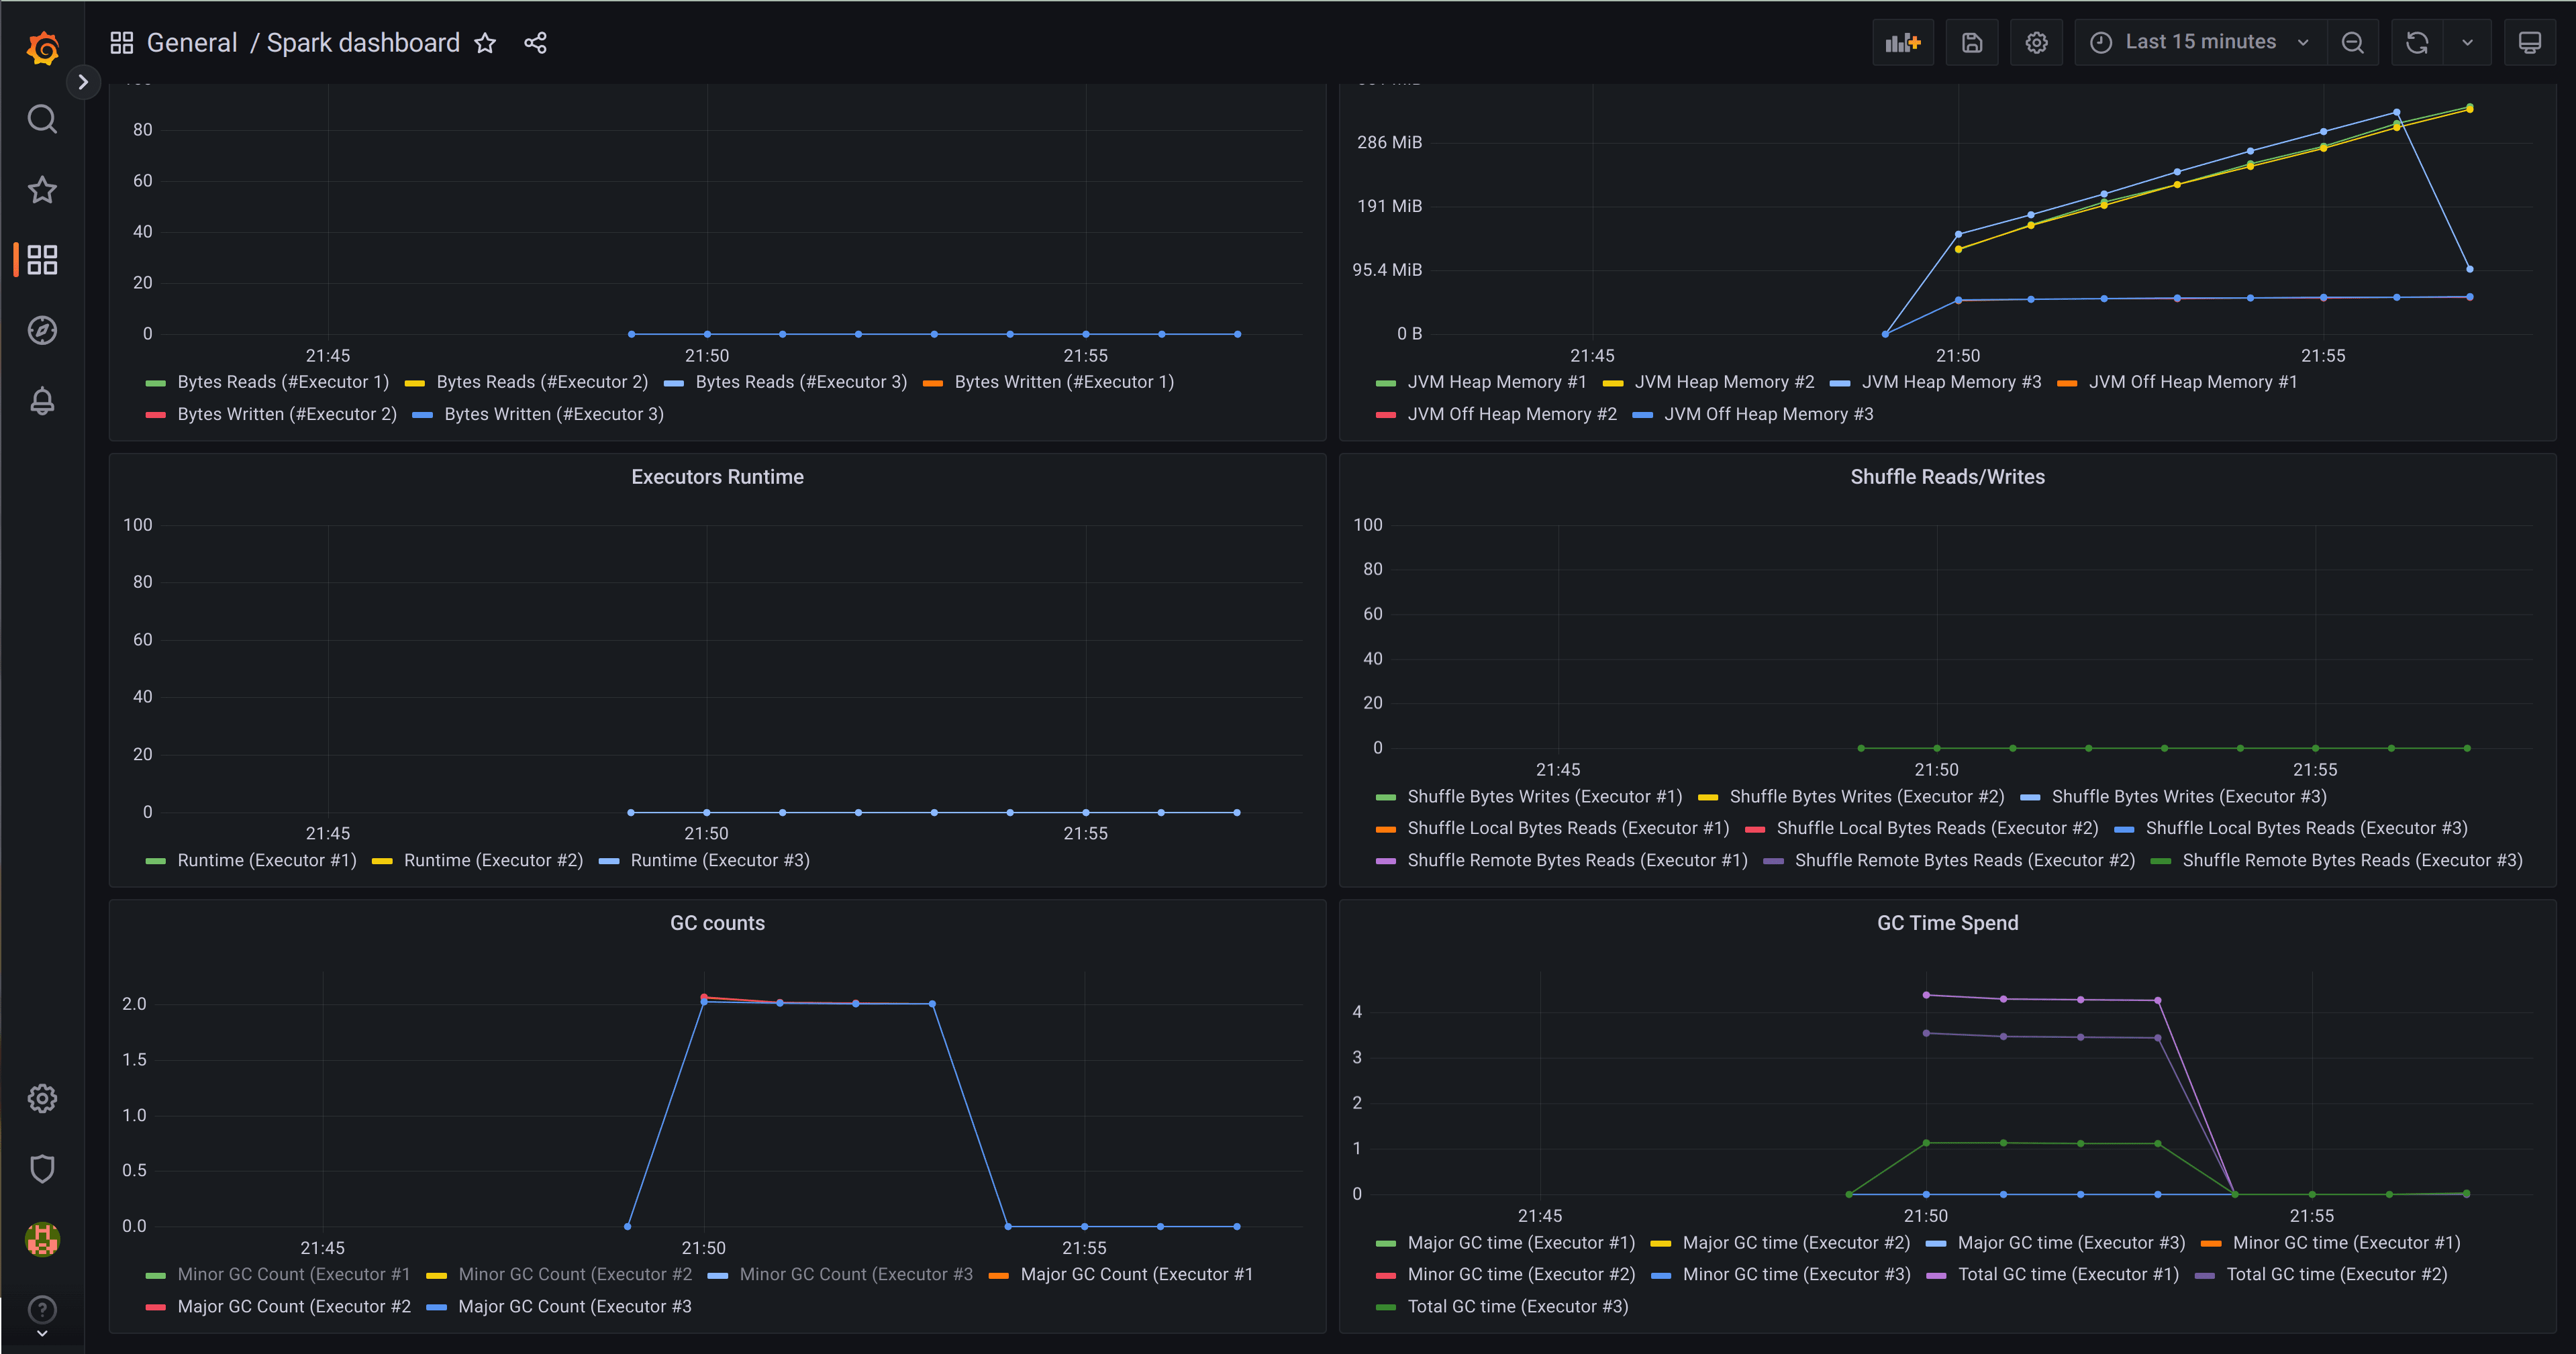
Access Spark dashboard
Navigate to the Spark dashboard where you can inspect metrics from prolonged Spark jobs.
Conclusion
This post elucidated how to deploy Spark on Amazon EKS with autoscaling and explored the advantages of leveraging Juju charms for swift deployment and management of a comprehensive Spark solution. If you desire further insight into Charmed Spark – Canonical’s supported Apache Spark solution, visit the Charmed Spark product page, reach out to the commercial team, or engage with the engineers on Matrix.
https://ubuntu.com